The Average Learner
Before your begin, make sure you have a USB stick or external drive large enough to contain the installer. Ideally >= 32GB.
Let’s Begin
Step 1
- Make sure your MacBook are supported. Check It Here
Step 2
-
See if there is any potential issue regarding your MacBook and the OS version you picked. Check It Here
-
Pay specific attention to graphical issues, it is common in AMD and Nvidia graphics with MacBook Pro models.
-
If you think you cannot bear the issue, try Ventura. Again, read the doc there if you don’t want to brick your machine.
Step 3
-
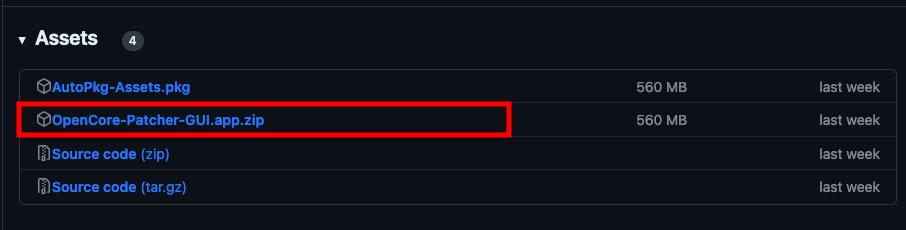
Download the latest version of OpenCore Legacy Patcher here.
-
Scroll down for the latest release, find a section which looks like this: (Download only the GUI.app.zip)
Step 4
- Follow the official guide here to download macOS and install OpenCore to your USB drive.
Step 5
- Enjoy
You can thank the developers by donating here.
Potential problem & fix
Couldn’t finish downloading macOS pkg through the tool. (Encountered it myself.) To fix this:
- Copy the link for the selected MacOS inside the OpenCore Legacy Patcher tool.
- Paste it into Motrix downloader, download from it. It is free and open source, no worries.
- When it is downloaded, locate it using the OpenCore Legacy Patcher tool to continue to install.
Tips:
-
Download could take very long. It took me about an hour and a half. Just be patient.
-
After the install, make sure you have Post-Install installation as well, OpenCore Legacy Patcher should automatically run it.
-
Install the OpenCore to your booting hard disk, so it doesn’t rely on your USB to boot.
I am now using a MacBook Air 2015 with SonomaOS while writing this article.
Cheers